Security is not a product, but a process. It’s not about an app or a platform, it’s about people and their actions. In AKS, security is not just a feature, it’s a mindset that should be embraced by all stakeholders involved in the application lifecycle.
ChatGPT
But why
Why using workload identity
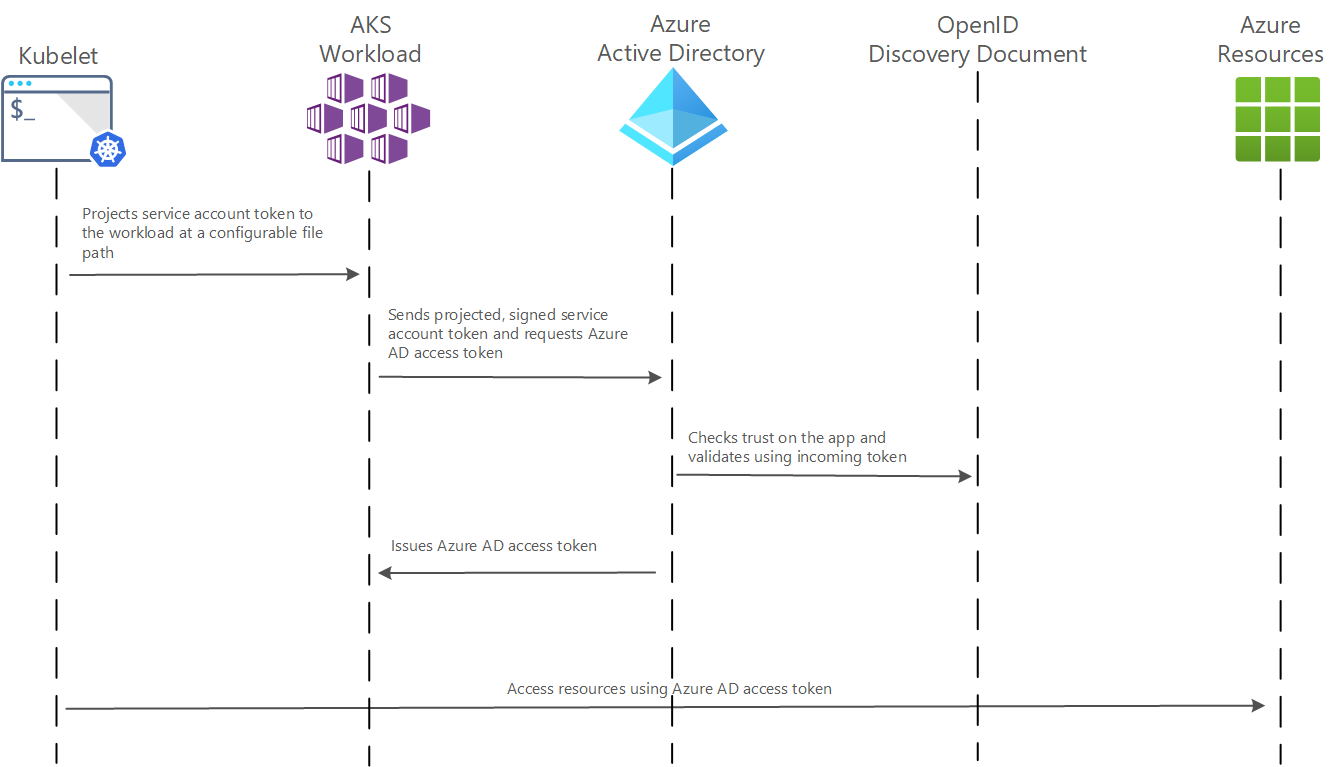
Your main motivation to use workload identity in aks might be your willing to improve security. Workload identity can improve the simplicity and security of your application by providing a more secure way of accessing’ your azure resources such as keyvault, storage, database, and more. Workload identity uses short-lived, limited-use credentials that are automatically rotated, which reduces the risk of credential theft or misuse.
Moreover you can use your Workload identity based in the scope of a aks pod. That’s a major feature of this tool, since in the case of an app in which the different function would be isolated from each other using the pods. Thanks to the Workload identity you could associate to each aks pod, a single credential with different rights over your Azure Resources. In the scope of the pod. Then for one cluster, you could use several identities.
Managing the credential of your aks pods / applications through AAD in the portal comes with an easier management of the credential. And with this, comes a better security through a better human handled lifecycle of your application.
Why using workload identity to access your database
Workload Identity in aks is something new. Why would I use it in my python app to access my Database instead of the legacy means:
- SQL account
- System assigned identity (assigned to your aks cluster)
Both this solution require to use frameworks in your python app, using sql account (password + login) to connect your azure database never have been recommended since: password will be stored as plain text, password are hard to managed, password are not tied to individual, password are hard to audit.
System assigned identity are a safe and efficient way to manage the access to your resources. But is not tied to a single pod. All your applications would be using the same credential, so the same right over your resources.
Step by step demo
1. Assigning THE ENV variable OF YOUR SHELL
You might set this few variable before running the Azure CLI command:
$workload_id_name=workloadidtest       # Name of the User-Assigned Managed Identity
$federated_id_name=federatedid         # Name for the identity federation
$sa_name=myserviceaccount
$sa_namespace=default
2. CREATE AND CONNECT TO THE CLUSTER
For our demo you can create your AKS Cluster with basic setting.
When done, connect kubectl to your cluster.
az aks get-credentials --resource-group <resource-group-name> --name <aks-cluster-name>
3. ACTIVATING THE PREVIEW FEATURE
At the time of this demo (march 2023) Workload Identity is still in preview. We should then allow the use of it:
az extension update --name aks-preview
az feature register --namespace "Microsoft.ContainerService" --name "EnableWorkloadIdentityPreview"
Check:
az feature show --namespace "Microsoft.ContainerService" --name "EnableWorkloadIdentityPreview"
az provider register --namespace Microsoft.ContainerService
4. ENABLE WORKLOAD IDENTITY ON THE CLUSTER
az aks update -n <aks-cluster-name> -g <resource-group-name> --enable-oidc-issuer --enable-workload-identity true -o none
5. SAVE THE OIDC ISSUER FOR LATER
Now that the OIDC is activated on the aks cluster, you want to save the OIDC issuer for later !
The OIDC issuer is the entity that issues OpenID Connect (OIDC) identity tokens. The OIDC issuer is the Azure AD tenant that is responsible for authenticating users and issuing tokens for access to Azure AD-secured resources.
$AKS_OIDC_ISSUER="$(az aks show -n <aks-cluster-name> -g <resource-group-name> --query "oidcIssuerProfile.issuerUrl" -otsv)"
6. CREATE THE WORKLOAD IDENTITY
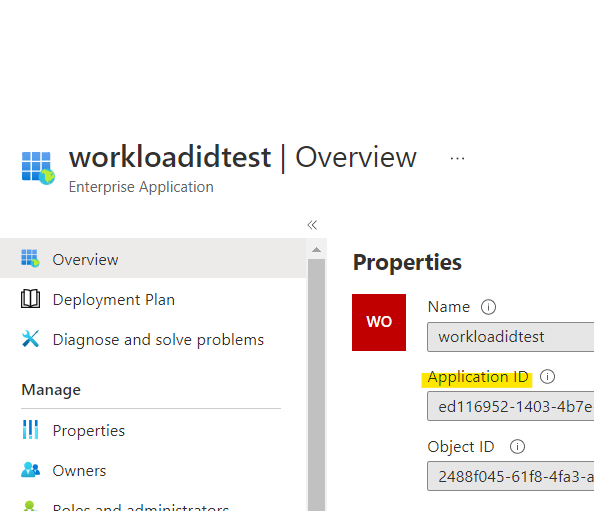
The workload identity will be created in the AAD directory, you can view it under AAD > Enterprise Applications > and by removing the filter on Enterprise Application
Let’s create it:
az identity create -n $workload_id_name -g <resource-group-name> -o none
Later when referring to the Workload Id > client-id. We are referring to the string referred as “application ID” if going through the portal.
Now save the Workload client id for later:
az identity show -n $workload-id-name -g <resource-group-name> --query 'clientId' -o tsv
7. DEPLOY THE SERVICE ACCOUNT
It’s time to deploy the Service Account.
The file:
apiVersion: v1
kind: ServiceAccount
metadata:
  annotations:
    azure.workload.identity/client-id: <workload-client-id>
  labels:
    azure.workload.identity/use: "true"
  name: <sa-name>
  namespace: default
The deployment command:
kubectl apply -f <name-of-your-file>
8. GENERATE THE FEDERATED IDENTITY
In order to work, OpenId Connect require a federated identity to establish communication with AAD.
az identity federated-credential create -n $federated_id_name --identity-name $workload_id_name -g $rg \
    --issuer ${aks_oidc_issuer} --subject "system:serviceaccount:${sa_namespace}:${sa_name}" -o none
9. ADD THE CREDENTIEL IN YOUR AZURE DATABASE
For this step we will give a role to the credential in your Azure Database.
Enter the following T-SQL queries:
Create the user
CREATE USER <workload-id-name> FROM EXTERNAL PROVIDER
Give to the user the appropriate right. In our case, the reading right:
ALTER ROLE db_datareader ADD MEMBER <workload-id-name>
10. CREATE THE PYTHON APPLICATION
Now we can finally create an application in Python that we will deploy to the cluster AKS.
We will use pyodbc to connect the database.
Here is the code to connect the database and run a query in it, you could use the result of the query to validate that Workload Id is working as expected.
server = '<server-name>.database.windows.net'
database = '<database-name>'
Authentication = 'ActiveDirectoryMsi'
driver= '{ODBC Driver 17 for SQL Server}'
Python

    credential = DefaultAzureCredential()
    credential.get_token("https://database.windows.net/.default").token
    accessToken = bytes(credential.get_token("https://database.windows.net/.default").token, 'utf-8')
    exptoken = b""
    for i in accessToken:
            exptoken += bytes({i})
            exptoken += bytes(1)
    tokenstruct = struct.pack("=i", len(exptoken)) + exptoken
    with pyodbc.connect('DRIVER='+driver+';SERVER=tcp:'+server+';PORT=1433;DATABASE='+database, attrs_before = { 1256:bytearray(tokenstruct) }) as conn:
        with conn.cursor() as cursor:
            #Run your query
            cursor.execute("SELECT TOP 3 name, collation_name FROM sys.databases")
            row = cursor.fetchone()
            #iterate in the result
            cursor.fetchone()
11. MODIFYING THE YAML DEPLOYMENT FILE
It is time now to deploy your image in AKS. To do so we will need to create the YAML file. and add 2 lines.
- azure.workload.identity/use: “true”
- serviceAccountName: <sa-name>
My deployment file looks like that, you should adapt it to your app.
apiVersion: apps/v1
kind: Deployment
metadata:
  name: main-app
  labels:
    app: main-app
    azure.workload.identity/use: "true" #__add this line__
spec:
  replicas: 1
  selector:
    matchLabels:
      app: main-app
  template:
    metadata:
      labels:
        app: main-app
    spec:
      serviceAccountName: <sa-name> #__add this line__
      containers:
      - name: main-app
        image: registryKubtest.azurecr.io/main-app:v19
        ports:
        - containerPort: 5000
12. TESTING THE APP
After deployment is finish you can access your app and see if your query have been executed.
To test your program, try to delete the role in the database, your pod shouldn’t be able to access the database anymore:
ALTER ROLE db_owner DROP MEMBER <workload-id-name>
You shouldn’t be able to run the query from your Pod anymore ! Congratulation !
Sources
Activate Workload identity on a pod:
https://learn.microsoft.com/en-US/azure/aks/learn/tutorial-kubernetes-workload-identity
https://blog.cloudtrooper.net/2022/11/19/workload-identity-on-aks-with-python-boring/
Connecting database with pyobc:
https://igeorgiev.eu/azure/how-to-connect-sql-database-app-service-managed-identity-python-pyodbc/

Leave a Reply